I know, I know. We’re supposed to take good photos and not have to rely on Photoshop or another photo processing software package to make them good. In my next life I’ll be able to do that. In this one, however, my photos sometimes need help. I’ve been working with a couple of friends who are photographers to improve my photos--both as I take them and as I process them. I’d like to share with you some of what I’ve learned.
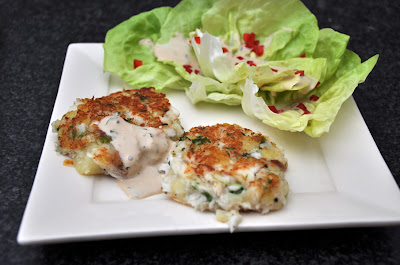
When my photos don’t turn out full of light, I can sometimes rescue them. One way is to adjust the levels. Have a look at this photo:
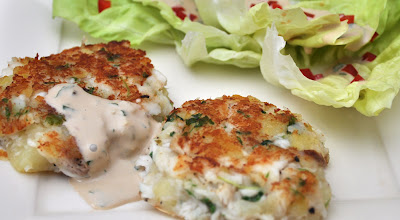
This photo didn’t start life like this. It needed a little rescue. It started life like this:

Ew. Underexposed. Dark. Too busy. Strange perspective on the plate. Not straight. This one looked like it might need major plastic surgery! But no. In two steps it looked much better. I simply adjusted the levels and cropped it. VOILA.
I can hear you now: ok, Kate, but how do you adjust the levels? The levels of WHAT? It’s really not very hard--if I can do it you can do it. Every photo manipulation package should allow you to adjust the levels. I’ll show you how to do it, but you have to promise to keep it a secret, ok? Just between us...
Here’s how. First, find the levels dialog box. In Photoshop Elements, it’s here:
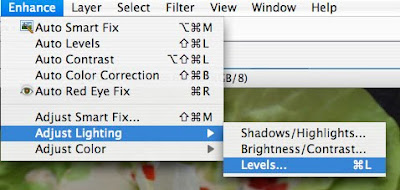
When you click on Levels, you get this dialog box:
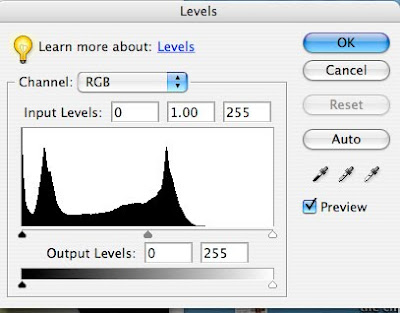
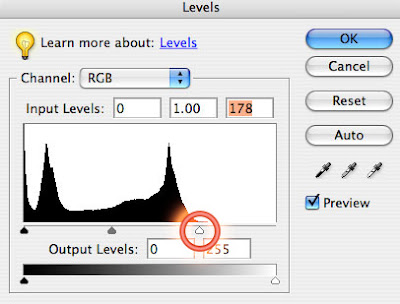
So now look at that graph on the left. It shows the distribution of colors from black (on the left) to white (on the right). The higher the line, the more of that color is there. Don’t worry too much about that--what’s important to know is that a good graph goes all the way across the range. This one doesn’t do that--it stops about two-thirds of the way. The whole right (white) side is zero. There are no real whites in my photo. If we look at the left-hand side (the black side) of this graph, we see that the line goes all the way to the top. There’s a lot of black in this photo. That’s because my countertop is black.
Ok, we knew that--we can SEE it. But we just need to know how to fix it. This graph is one very good way to do that. See the little pointer at the bottom right hand corner of the graph? I’ve circled it for you here.
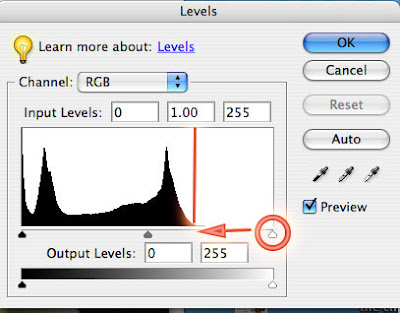
You want to click on that and move it to the left until you get to the point where there is some black on the graph. I’ve marked that point with a red line here.
When you’re finished, the graph looks like this:
If you click on “OK”, then you'll see that some magic has happened to the photo:
If you click on 'Levels' again, here’s what the graph looks like now:
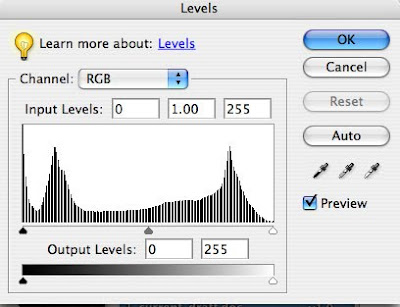
See how the graph now extends all the way across? That means that you’ve got values all the way across the range. That’s GOOD. See those white lines in the graph? They're there because you’ve stretched limited data across the value range. You don't want them to be too big, because if you stretch the graph too far, you’ll see bands of color like on the old televisions. That’s not good. Unless they’re really wide you won't see any effect of them--this amount of ‘stretch’ is ok at this resolution. Howver, I might have some problems if I tried to blow this photo up really big.
So now our photo looks better. However, it’s still not done. It needs a good crop. In order to focus on the fish cakes, I cropped it like this:

If this is the photo I’ve chosen to submit to any of the food photo sites, though, I crop it differently. I make sure it’s square, because if I don’t crop it, they will. And I want to make sure that it’s MY crop that gets seen.
Here’s another photo, before and after a levels adjustment:
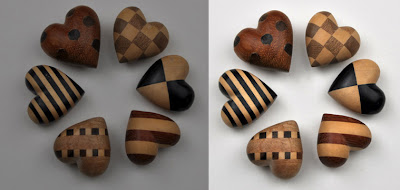
Let’s look at one more. This photo wasn’t too bad to start with. It just needed a little bit of help. Look what happened when I adjusted the levels:
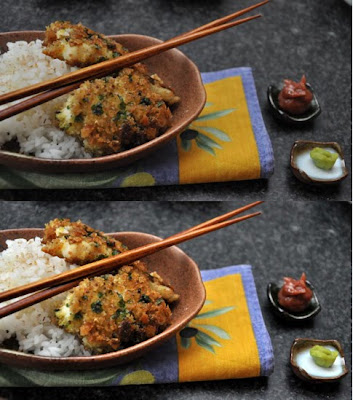
In a perfect world, all of my photos would be perfectly exposed. One day that will be the case. They’re getting better. Still, levels adjustment is a tool that I use often. It can add a brightness to photos and make them shine.
Now for the homework (Whaaat?) Find one of your photos that's a little dark and gray. Try this with it. Let me know how it turns out, ok?
I’d love to know what tips you have for improving photos.
EDIT: You don't need to have photoshop to do this. Any photo software should let you adjust levels. If yours doesn't, download GIMP for free: http://www.gimp.org/ GIMP looks a lot like Photoshop, and has most of the same functions. You'll find tutorials and complete documentation as well. I have a MAC and it works on that too.

28 comments:
Good good tutorial..I never knew what the droppers were for either..I have to experiment..now that you have mentioned them..
I usually adjust brightness and contrats..I have worked with High Pass.. From time to time I foregt steps:(
Thank you for this tutorial..My Oly has a sharpener in the camera..it rarely needs sharpening..the Canon one is softer in house.
PS and thank you very much!
Thanks so much Kate....Lord knows I can use the help.
I do not have Photoshop and the only tips I have are to say a little prayer before I take the picture.lol
I am not a good photographer...for me it is all about the food...
But I am going to try some of your tips...ya never know...even I may improve!
L~xo
I recently learned how to use the level sliders myself and they really do help! Before that, I only used the Curves menu to adjust lighting. I find the Level sliders work much better.
Great tutorial, Kate!
Woot! Woot! Thanks, Kate! Excellent post... I intend to try a few photos this PM ... I don't have Photoshop, but will play with my HP software and see what's what....
Fabulous tutorial, I'm sure everyone will find it useful, except me!
I don't have photoshop!LOL.
~Maggie~
You don't need to have photoshop to do this. Any photo software should let you adjust levels. If yours doesn't, download GIMP for free:
http://www.gimp.org/
GIMP looks a lot like Photoshop, and has most of the same functions. You'll find tutorials and complete documentation as well. I have a MAC and it works on that too.
Thank you so much Kate for taking the time to post this tutorial. I'm working on my photo skills very slowly. I will need to read this over and over again but eventually, I may pick up a tip or two.
In the mean time, I'm going to download GIMP. I too have a Mac...
Thanks so much for sharing...
Where have I been all these while???? All along, I only relied on Picasa to edit my photos. Thank you Kate! Bless you! I am so gonna use your post as a step-by-step tutorial. First I have to download GIMP. Have a great week!
im printing this whole post out!!! thanks a million..do I need help...mine are ever so dull always..
I'm definitely going to check this out! I think I have HP software, but I'm really not sure. Hopefully I can decipher my software program and use this tool. Thanks for the info:D
Hi Kate, I have Photoshop and have just begun to snoop around to see what it can do. I haven't tried anything in the 'levels' area yet. Nice tutorial! I love reading about stuff like this-so helpful.
Good tutorial Kate...:) I know a lot of people still struggle with the concept and you explained it very clear!
I have been ever so grateful for digital photography. No taking pics without knowing what they look like. I look back at some of my pics from years ago and suddenly am in awe. It was always such a surprise if you got a good shot. Now we can do some darkroom simulation. My son, (who cut his teeth on Photoshop and knows it inside and out) poo poos any photo manipulation. He only shoots film and thinks it's a compromise to use Photoshop. Ah, youth! He never waited 3 days for pics to come back and have them all bad.
Thanks for taking the time Kate. I often coax a little more light, sharpness and color out of my pics through Photoshop...don't tell my son!
Thanks for your tutorial....I believe in using the tools before us.
Diane
Great tutorial Kate - I am just launching myself into Photoshop Elements and am looking forward to the part of my 10 week intro to digital photography course that will teach me all this stuff in person. This, in the meantime, is fabulous!
Oh Kate...thank you for your tutorial...love it!
what a difference a little light can make. nice explanation, kate--thanks!
Great tips. Lighting has been the bane of my existence in my new apartment. I finally bite the bullet and got a photography light, can't wait to see how it works.
I use photoshop too Kate, but also use Irfan. It's a free download and every photo you use will come up on your computer in Irfan. No big deal, you can still do anything you want with it, but faster. My computer teacher way back had me download Irfan almost immediately.
And thanks for the really informative and detailed info PLUS Happy St. Patrick's Day!
Hey Kate, I have an award I wanted to pass on to you. Drop by when you have a chance to pick it up!
Thanks for sharing your knowledge! You're getting to be quite the pro! Seriously, the difference in the before and after photos is clear.
I don't have photoshop, just the iPhoto editing, but I need to check out Gimp. Thanks, Kate! Great post.
Oh, Kate, thank you, thank you, thank you!!!
I have never used that function...I had no idea how!! I so appreciate the tutorial. I will practice this weekend when I am not rushed.
This will be fun. I so appreciate your sharing your learning with us!!
Excellent tutorial Kate and very helpful. Photoshop really is a miracle worker. Your crab cakes are gorgeous. I hope you had a happy St. Patrick's day. When you get a chance, please stop by my kitchen. I have something for you.
Sam
Wow! I can't believe the transition in the first photo. This makes be believe that there might be help for my little pictures. :)
Thanks so much for posting this. I have GIMP and after I read your post I went looking for the levels adjustment in GIMP and found it. I've been experimenting a little and am starting to get the hang of it.
Thanks!
Kate,
This a wonderful tutorial!!! I have a Mac and a Dell. I am trying to use the Mac more but the learning curve is very crooked. I will play with GIMP and the levels. I normally don't adjust at all but this I will try.
I cannot believe you went to the Vietri factory. I love the stuff and have a bit of it and plan on some more.
Carol
Thanks for the tutorial. We all need the help we could get. Thank you.
Bravo ! c'est clair et bien expliqué,
vous allez pouvoir vous lancer dans des stages de traitement d'images !
Post a Comment